With over 1.4 billion international arrivals happening per year worldwide, it’s wise to have a date range picker on a reservation form.
Allowing travelers to easily pick their favorite hiding spot that provides them to choose check-in & check-out dates effortlessly.
If your WordPress site doesn’t have any date range picker, then in this tutorial, we will unravel the process that can help you make the best reservation form on your hotel website easily.
Moreover, the date range picker we’ll add to the reservation form would be possessing advanced features like specified time intervals, disabled dates or days, and much more.
So, without any delay let’s get started.
Preview
What’s a Date Range Picker?
For travelers, a date range picker on a reservation form is something that allows them to choose their check-in and check-out date based on their vacation length.
On the contrary, for a hotel owner, a date range picker is something that allows him or her to create a highly functional form that can provide date slots, time range, or even hide dates on which the hotel isn’t receiving any bookings.

The owner can specify the date format, make changes to the time interval, and much more.
How to Integrate Date Range Picker on a WordPress Hotel Website?
The following step-by-step instructions will help you to easily integrate a date range picker on your hotel website’s reservation form.
Step 1: Check WordPress Is Updated to the Latest Version
Before we move on to the step that installs and allows you to integrate a date and time range picker, it’s best to check that you’re using the latest version of WordPress.
So, you’d get the most out of your reservation form, date range picker as well as your hotel website.
Not sure whether the WordPress is updated or not, then follow this.
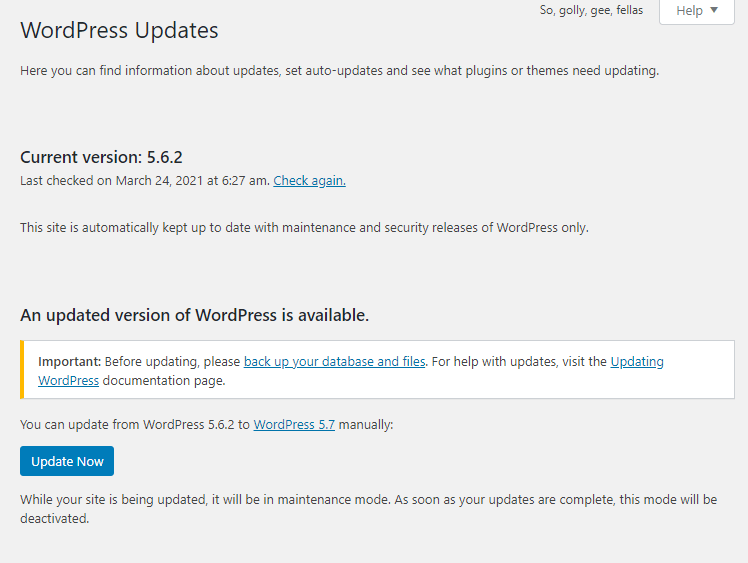
On your WordPress Dashboard, go to Dashboard → Updates.
If there will be any update available, you’d see it there, plus you’ll also get the option to update it, just like the below screenshot.
Once updated the WordPress, move to the next step.
Step 2: Install Contact Form 7
To create a reservation form that allows users to select their check-in & check-out dates, we need to install a contact form plugin.
And what’s more better than a free WordPress plugin like Contact Form 7.
This single plugin provides you with a handful of options that allow you to create a highly functional contact form.
If you’re wondering how best you can use the Contact Form 7 plugin, you should follow this tutorial.
It will guide you to use the Contact Form 7 plugin at its best. Moreover, you’ll become an advanced user from a beginner.
Once installed the form plugin, we need to install another plugin that will enable us to add a date range picker on a reservation form.
Step 3: Install Date and Time Picker Plugin
To convert the reservation form’s input field into a date range picker, we must install another plugin that is Date and Time Picker.

The Date and Time Picker plugin is developed by InputWP to help the user add a date calendar, time range picker, and even date range picker to the contact form without any extra efforts.
It’s an easy-to-use, lightweight, and powerful plugin that combines many functionalities that don’t even lower the site’s performance, unlike other booking plugins full of features.
Some of the key functionalities of the Date and Time Picker plugin are —
- Set minimum & maximum time.
- Set minimum & maximum dates. (Based on the current date)
- Disable past dates with a click.
- Automatically display the next available time slot.
- Display date range picker Inline.
- Multiple Date and Time formats.
- Disable specific weekdays.
- Disable specific dates.
- And a lot more.
Step 4: Create Date Range Picker Fields (From & To)
As the Date and Time Picker plugin has been installed, it’s time we create custom fields that would come in use later for converting input fields into date range picker fields.
Step 4A: ‘From’ Picker Field for Check-Ins
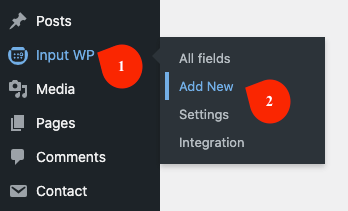
The moment you install and activate the plugin, a new menu appears in the WordPress Dashboard, i.e., Input WP. Head towards it and click Add New.
Now, just like a post editor, a field editor window would come up. Here, you need to first enter the title of the field inside the Add Title input field.
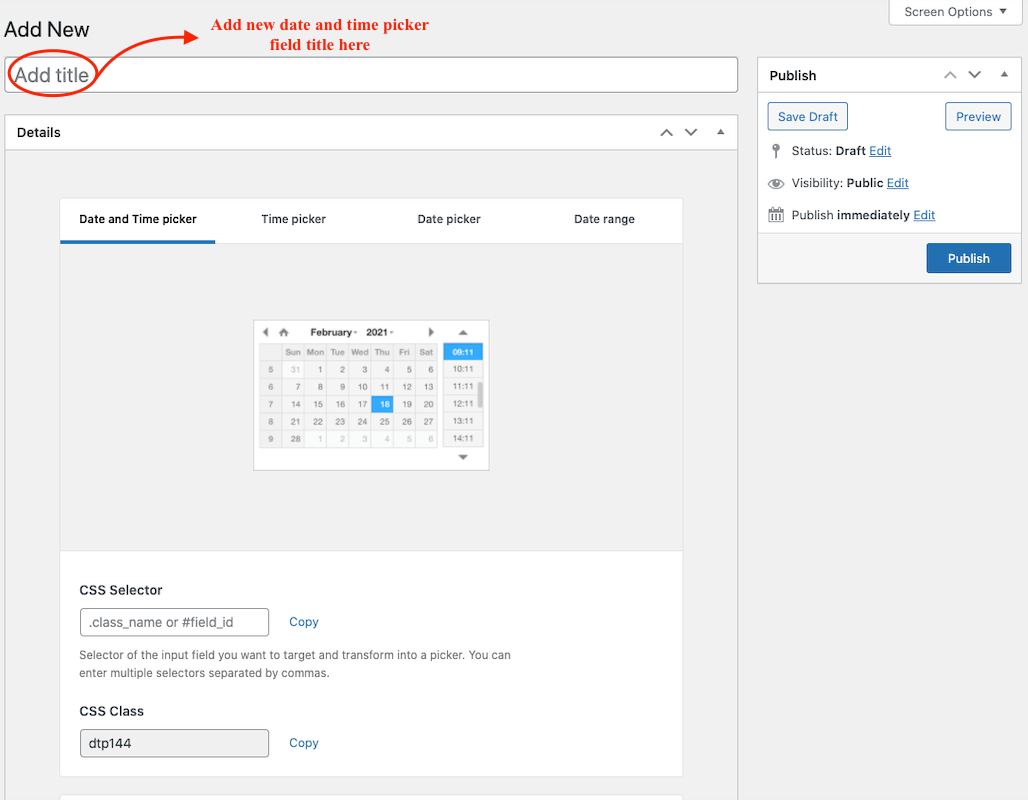
Then, go to the Date and Time picker option, and in the CSS Selector field, assign a class name.
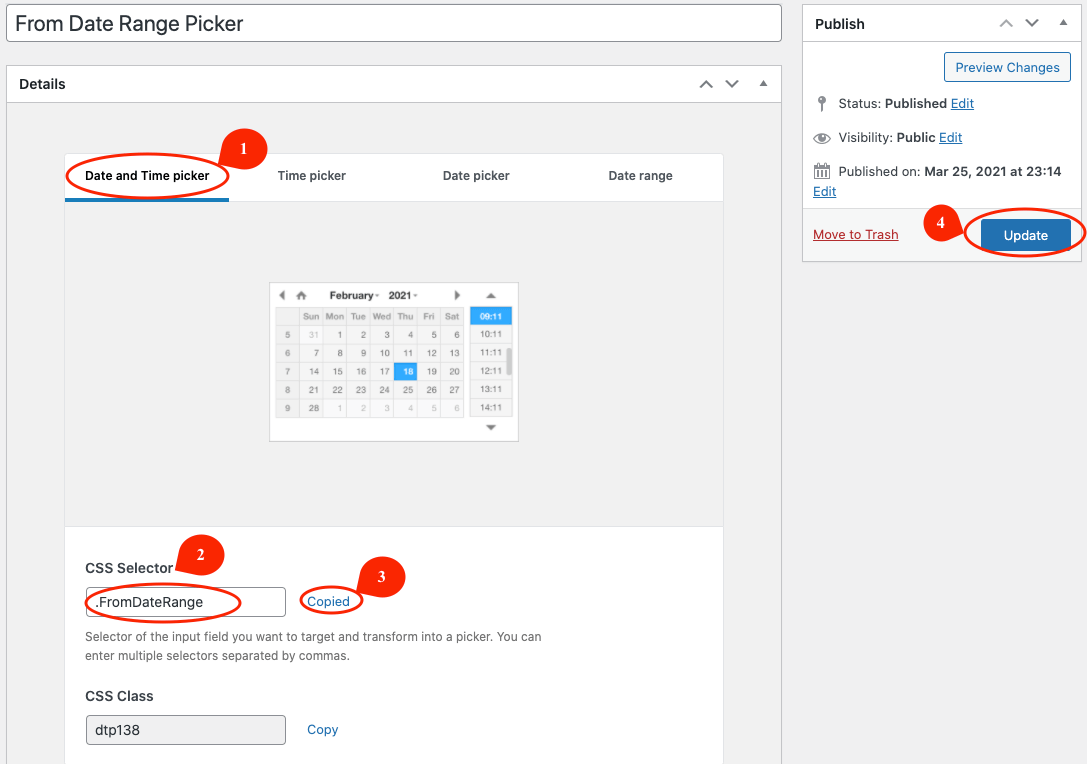
Copy it and click the Publish button. (I’ve used a pre-defined field, so in that case, it will display the Update button.)
We’ll check out the advanced features later on in this tutorial.
Step 4B: ‘To’ Picker Field for Check-Outs
The field for Check-Ins has been created, and to create the Check-Out field, follow the first two steps of creating a new field, which is to go to InputWP → click Add New.
Then, input the field title recommended “Check-Outs.”
Now, go to the Date range, and input a new class name for the CSS Selector.
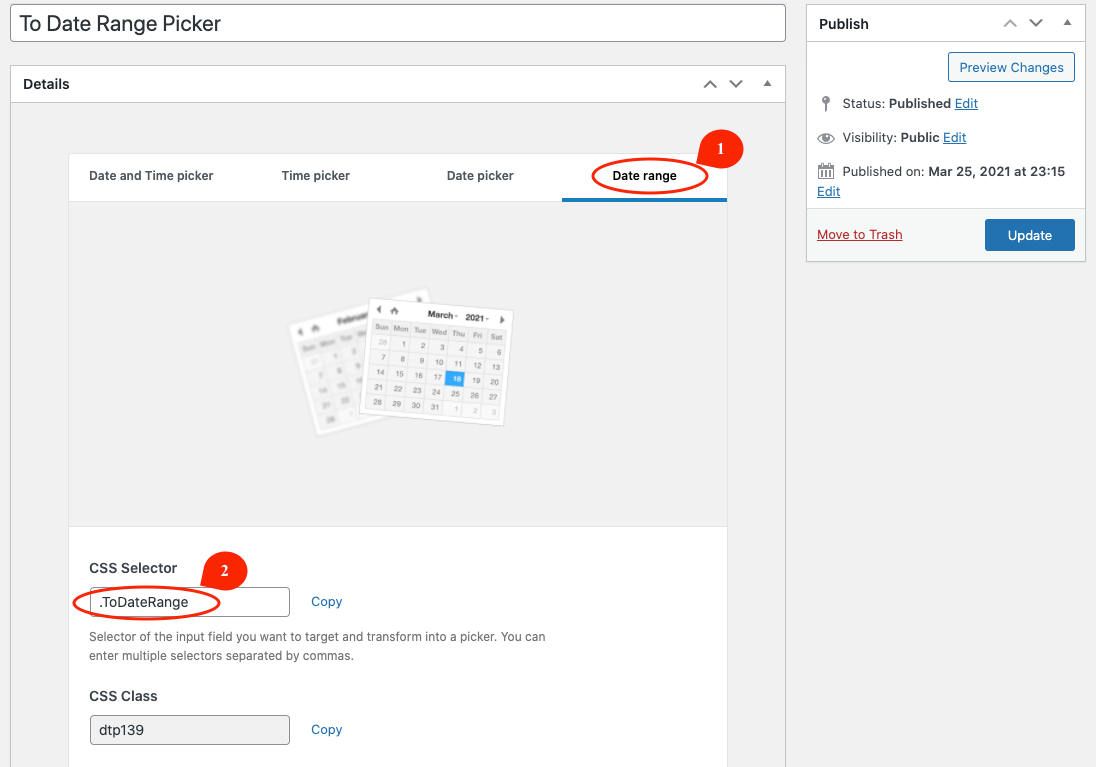
After this, head over to the Range Selector (From) input field.
Here, you need to paste the CSS Selector you’ve copied in the previous step — the CSS Selector of the From field.
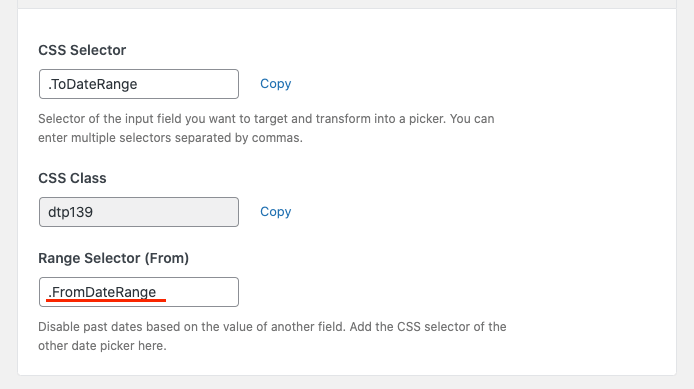
I’ve pasted the Class name I’ve used in the From CSS Selector in the above screenshot.
Once you’ve entered both the Range Selector (From) and CSS Selector for the check-out field, don’t publish it yet.
To display the time picker along with the date calendar for the ‘To’ or ‘Check-Out’ field, you need to first go to the Date and Time picker of this field, and then you need to publish it.
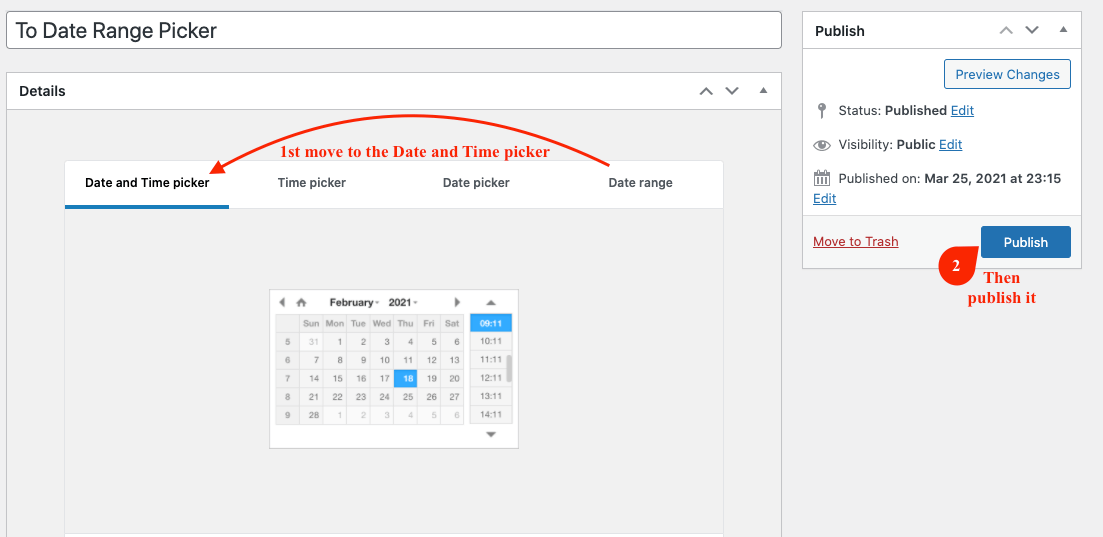
Before you move to the next step, don’t forget to copy CSS Selectors of both the date range fields — From and To.
Step 5: Create a Contact Form & Assign Custom CSS
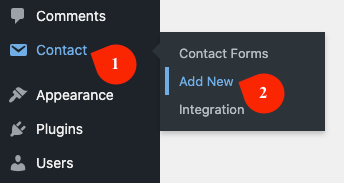
As you’ve already installed the Contact Form 7 plugin on your site, you can see the Contact menu on the WordPress Dashboard.
Head over towards it, and click Add New.
If you’ve already created a reservation form and now want to add a date range picker, then you need to click Contact Forms and then further go to the form and edit it.
In both cases, a form editor will open. However, for the new form, you have to enter its title.
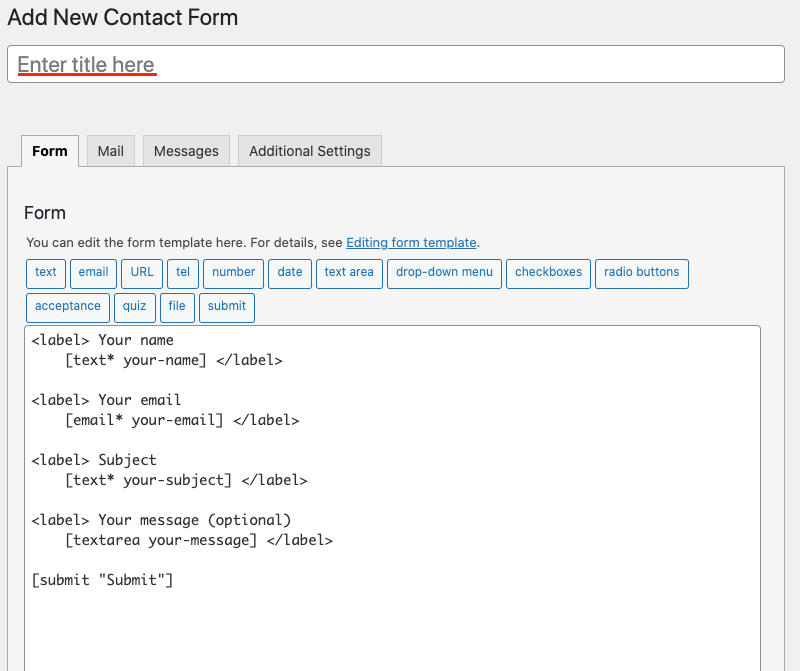
Now, add a new text input field by clicking the text button at the top of the form editor.
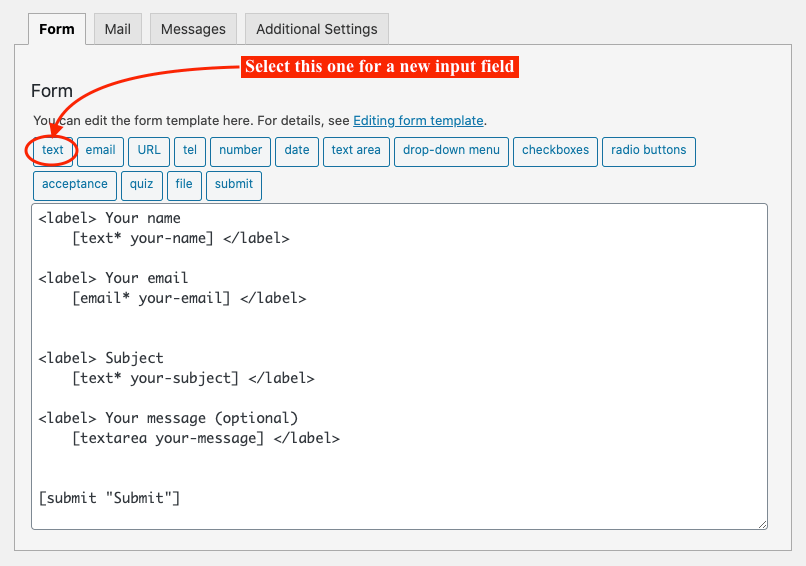
This will open a popup that would allow you to add details about the input field. Here, what you need to do is that you’ll have to paste the class name of the date range picker field.
Go to the Class Attribute, and paste the class name for the Check-In, i.e., FROM field, which was ‘.FromDateRange.‘
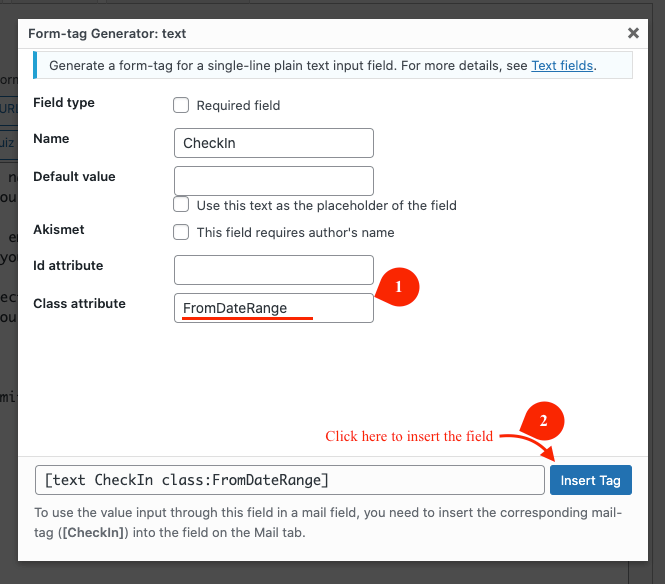
Save the field by clicking the Insert Tag.
Now, repeat this step for the Check-Out, i.e., TO field. Make sure you paste the respective class name of the TO date range picker. In my case, it was ‘.TODateRange.’
Once added the CSS Selector, save the field, and then save the form.
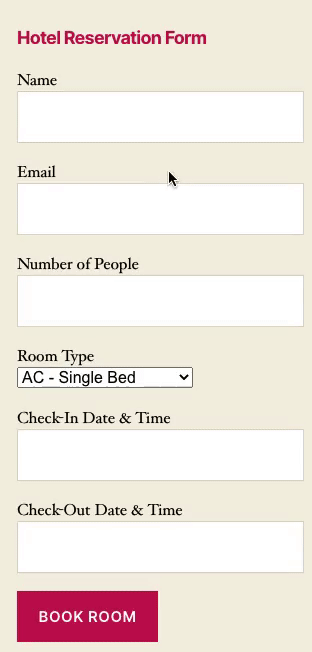
Now, copy the form shortcode, and go to the page where you want to add a reservation form. Add the shortcode, and your reservation form will perform like the below illustrator.
Advanced Options of the Date Range Picker
The form is created and will allow users to select dates for check-ins and outs based on their vacation duration.
However, there are times when a hotel owner requires the reservation form to perform some specific tasks.
And the tasks could be for performance, user engagement, or to restrict users booking their rooms on certain days of the month.
How do we can do that? Let’s find out.
Note: The following steps need to follow separately on both the Date and Time Picker & Date Range to apply tweaks on From & To fields of a reservation form.
How to Change Date Range Picker Theme?
By default, the appearance a date and time picker has is Light or White.

But if you want to change it to Dark, then first go to Input WP → All fields, and edit the field.
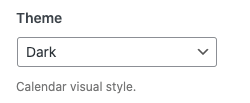
Now, go all the way down, and in the Theme dropdown menu, choose Dark.
After selecting the theme, update the field.
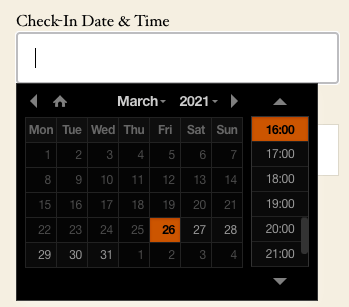
Once it gets updated, visit the page where you’ve added the reservation form. Your date picker field will look the same as the below screenshot.
How to Change Date Format?
Want to simplify how the date picker would show dates on the field? Then, first, follow the same instructions mentioned in the above steps to edit a field.
After that, scroll down a bit, and go to the Date Format dropdown menu.
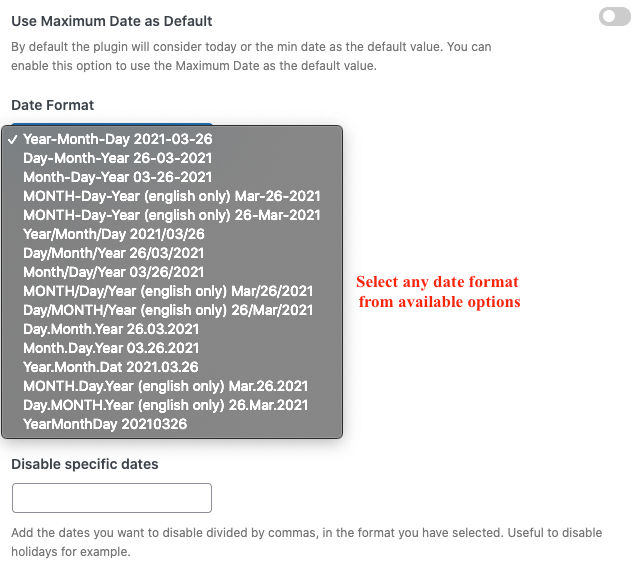
Click it to open multiple date format options. Choose any to set a different date format on the date range picker from the default one.
Once selected, update the field.
How to Disable Past Dates?
First, edit the field.
Second, go to the Disable Past Dates section, and tick the checkbox right next to it.

It will disable the past dates from the current date. For example, if today is 1st October, the user cannot select dates like 30th, 29th September, or any previous dates before October 1st.
However, if you want to disable some specific dates, for instance, on national holidays.
Go to Disable Specific Dates passing Date Format section, and input the dates in the same format you’ve selected in the Date Format section.
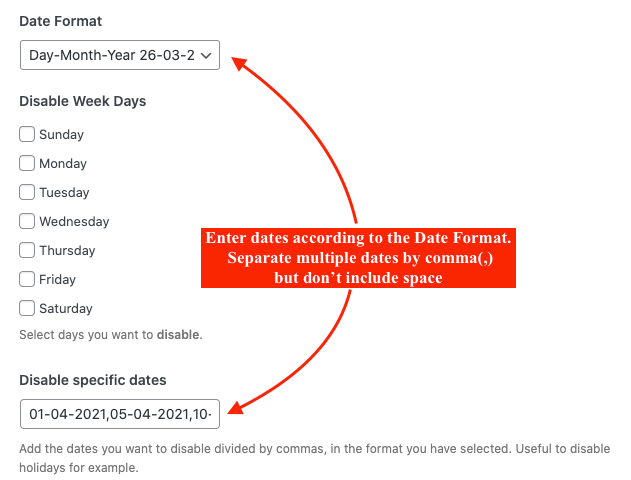
For multiple dates, you can separate them by comma, just like the above screenshot.
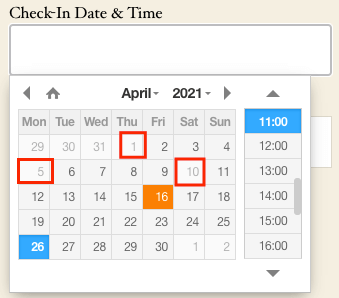
And as you can see in the above screenshot, the date calendar has hidden the disabled specific dates. The background color of the disabled date is white compared to the grey color of the available dates.
Explore More Advance Options
That’s not all; when you install Contact Form 7 and integrate it with the Date and Time Picker plugin, you get more options to apply on your reservation form. Like, offset days, set minimum and maximum date or time to limit users select certain days or time.
It also provides you with the functionalities to integrate your reservation form with Google and Outlook calendar.
So, you don’t have to take your form’s data into a calendar manually.
Try it today, and let us know what was your experience using it. If you face some issues using it, let us know that too, we’d be more than happy to assist you and create a highly functional reservation form with a date range picker on your hotel website.
2 Responses
How use this in the new form?
Hi,
Replied to your thread on the Support forum page. https://wordpress.org/support/topic/date-ranges-3/#post-14674631